Olla Watering System: Everything You Need to Know to Get Started
The Cottage Peach is reader-supported. When you purchase through links on our site, we may earn an affiliate commission at no additional cost to you. All opinions are our own.
Did you know you can water your entire garden bed without lifting a finger and reduce your waste water by 70% for about $5 using just a clay pot? Today I’m going to show you how to make a self watering olla pot system for your own garden.
What is an olla watering system?
Olla (pronounced oya) means “pot” in Spanish, but the concept of using ollas as an irrigation system goes back thousands of years and has been used in countless cultures around the world. An olla watering system is basically any type of unglazed clay pot that is buried beneath the soil with only a small amount sticking up above the surface and filled with water. You can tell that a pot is unglazed because it will be that classic terracotta red color with no shiny finish, glaze or paint. The water then leeches out of tiny holes or “pores” in the unglazed clay and is pulled through the soil to the roots of your thirsty plants using a process called soil moisture tension. This functions much the same way as osmosis, in that the water is trying to equalize to a certain level of moisture within the soil. This means your soil will never become overwatered either - if the soil is moist, the water stays in the pot until it is needed.
Why should you use an olla watering pot?
Watering the garden is a task that isn’t easy for everyone. Personally, I struggle with bending down and kneeling in the garden to water and weed because of my arthritis. When I was planning my garden this past spring I was in the middle of a bad flare and I knew I needed to choose an irrigation system that would ease some of the physical demands of gardening and allow me to continue growing all the fruits and vegetables I could without hurting myself. There are so many different watering systems available today, from drip irrigation to sprinklers, but I wanted to find something that was budget-friendly and used common everyday items.
An olla pot is perfect for garden irrigation because all you need is a clay pot and some type of lid. You only need to fill them every 2-5 days depending on your climate (hotter, dryer climates will be on the lower end of that spectrum and wetter, cooler climates on the higher end) and it takes just one minute or so to fill the pot from your watering can versus standing there for ages with a hose.
As of August 30, 2022, 38.23% of the U.S. and 45.53% of the Lower 48 states were in drought. With climate change on the rise, this number is only expected to get worse. I know in our tiny town we are under a water restriction notice for most of the summer, and this is a common issue in many neighborhoods. I’ve even heard a few reports that said to expect summer 2022 to be the coolest for the rest of our lives - and it felt like the hottest one yet. Not only does a watering restriction in your town eliminate hose watering as an option, it means any watering system you do use should be as efficient and waste as little water as possible.
Olla pots reduce wasted water by about seventy percent, since most of the moisture is held underground and not lost to surface evaporation. This is a huge savings over traditional watering methods and means you can significantly reduce your water consumption in our drought-prone climate. This will lower your water bill as well as make your homestead more environmentally friendly!
Olla pots also help you to grow happier and healthier plants. The root systems in your plants will also be healthier, as they reach out towards the underground water the roots will become larger and sturdier, keeping your plants from falling over. Most importantly, plants that are watered at the soil level are less prone to infection with certain fungal diseases that thrive in damp environments, since the leaves of your plants will not get wet as often. Because of the soil moisture tension phenomenon, your plants will also never be overwatered.

What is the best olla pot you can buy?
This DIY olla may not be for you if you can’t find genuine terracotta pots affordably in your area, or don’t have the time to make one yourself. If you can’t make your own olla, or you want hook up your ollas to an automatic rainwater harvesting system that will continuously refill your ollas for you from free rainwater collected from your roof, check out this automated olla watering system.
I added this drip irrigation/olla hybrid setup to 3 of my raised beds, and it’s made an already pretty hands-off system completely self-sustaining; water is collected from my roof into a 50 gallon barrel, flows automatically into reservoirs and down the irrigation tube into individual terracotta cups. Setup is easy - in my opinion, this is the perfect garden watering solution.
What plants grow well with olla pots?
There is some debate about whether olla pots work for any type of plant. Of course, all plants have different water needs and root systems. In my experience and from comments in my community, there doesn’t seem to be any plant that can’t thrive with an olla pot - from trees to squash, corn and beans, all the way down to simple lettuce. Experiment in your own garden and find what works best for you!
How do you make an olla watering system?
Here’s the supplies you will need to make an olla watering pot system:
1 eight to ten inch unglazed terracotta pot per 4x4 foot area - click here for the ones I use
Moldable glue if your pot has a hole in the bottom (I like sugru)
Plant saucer to use as a lid - click here for the lids I use
A rock or two to weight down your lid
You will want to start by calculating how many olla pots you will need. As a general rule of thumb, you should have one olla pot per four by four foot area in your garden. The olla pot can water up to two feet away from where it is buried, which means even if your garden is just two feet wide by eight feet long you’d want two olla pots - one every two feet.
If your olla pot has a hole in the bottom, you’ll need to cover this so the water you put in doesn’t just pour right out the bottom. You can cover the hole in the bottom of the olla pot with sugru moldable glue, caulking, clay, poster mounting putty, a cork or something similar.
Dig out a space to bury your olla pot in your garden bed. You can olla pots in raised beds or in-ground gardens, but you’ll need larger olla pots for in-ground beds, ten to twelve inches should be fine. The hole should be about as deep as your pot is tall - however, my raised beds are too shallow to fully bury the pot and they still work fine.
Place your olla pot into the hole and replace the soil around the edges of the olla.
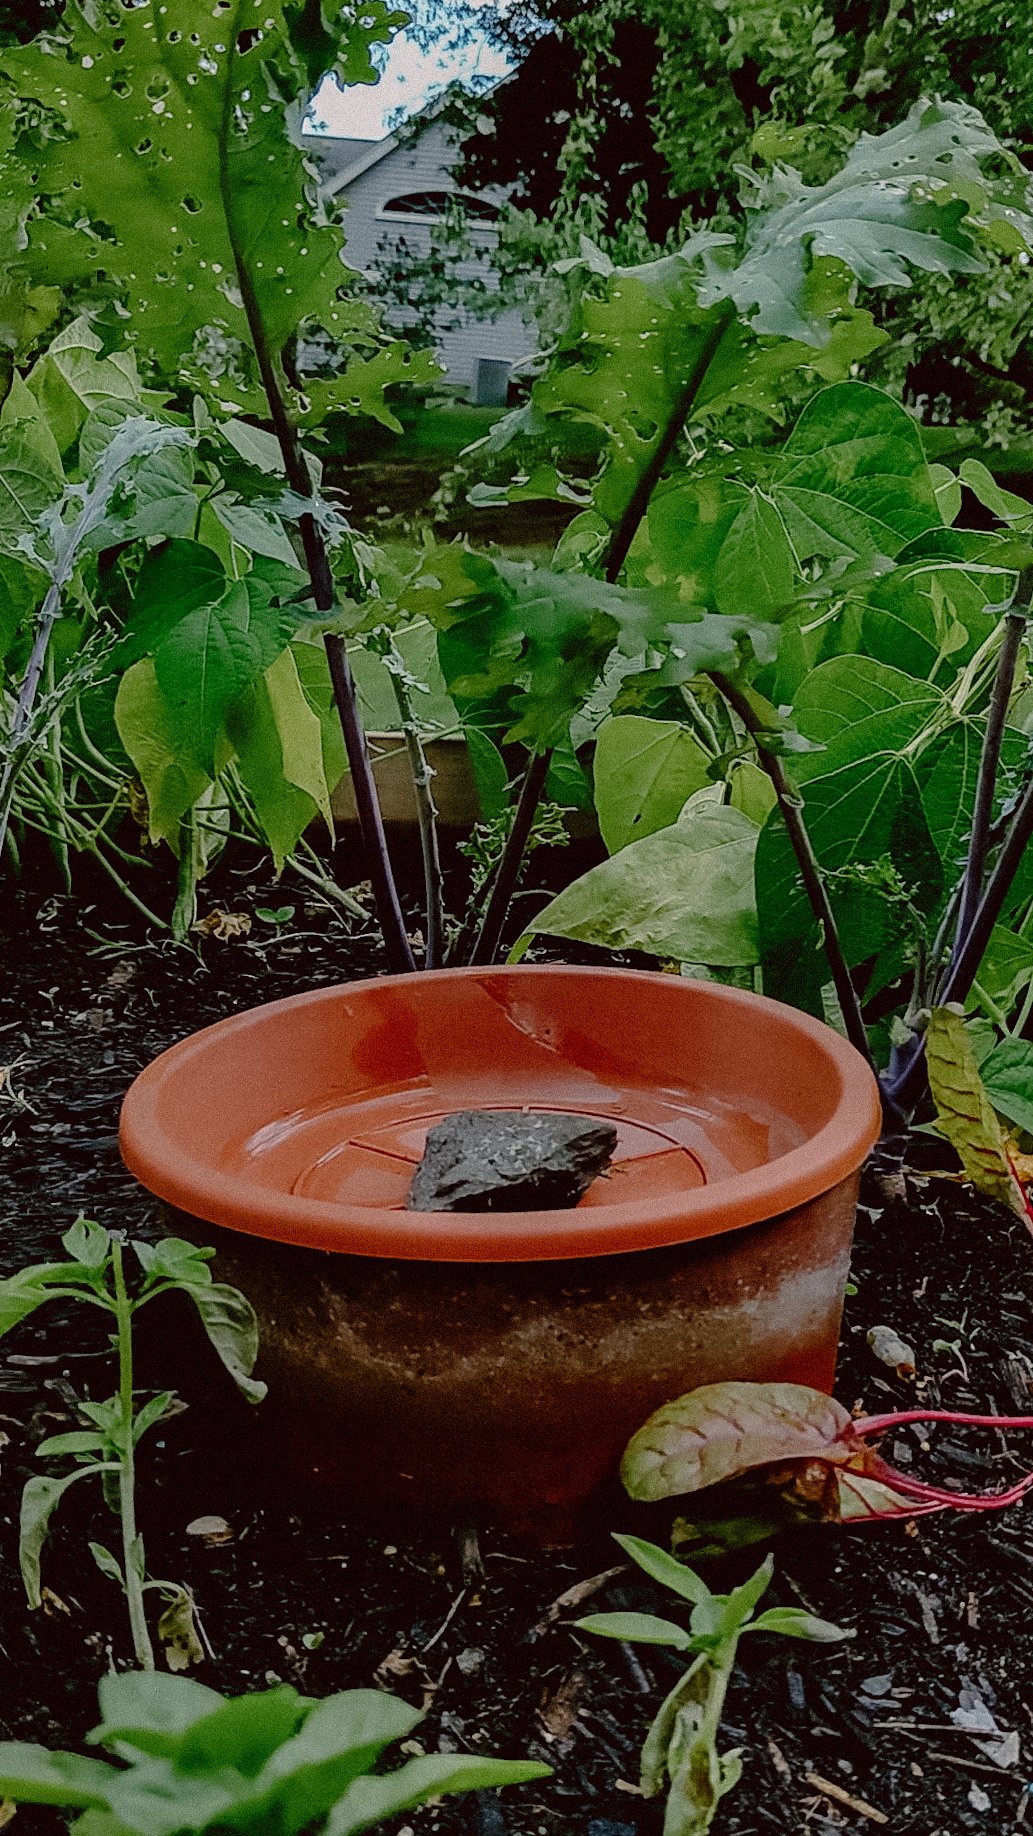
Fill the olla with water and cover with your chosen lid. This helps to keep bugs out and prevents the water from just evaporating before it has a chance to seep into the soil. My lid is very lightweight, so I chose to weigh it down with a rock and then decided to add even more small pebbles and rocks to create a watering station for pollinators.
Depending on your climate you will need to refill the olla every 2-5 days. I recommend checking it the day after you install to make sure there’s no leaks in your olla - if all the water is gone and it wasn’t a heat wave that day I’d check your seal and try again. Then check every other day until you get a sense for how often you need to refill the pot.