
BACKYARD GARDENING MADE SIMPLE

Plant a Sustainable Future: Celebrating Earth Day with DIY Wildflower Seed Balls
Seed bombs are one of my favorite nature craft ideas, because they are simple, fast and easy for anyone to do and the result is a more beautiful planet. Since the seeds do not need to be buried to grow, you can just toss your seed bombs into empty and neglected areas, watch and wait and in a few months you should have some beautiful flowers growing! The patch will likely self-seed and continue to develop and grow with each passing year that goes by.

The Cottage Peach is reader-supported. When you purchase through links on our site, we may earn an affiliate commission at no additional cost to you. All opinions are our own.
One of my most loved books from childhood is Miss Rumphius by Barbara Cooney. Miss Rumphius was inspired by the real life "Lupine Lady," Hilda Hamlin, who spread lupine seeds along the Maine coast. The story follows Miss Rumphius through her younger days into old age as she spreads lupine seeds from her bicycle all the way up until she is lying sick in bed and enjoying the view she has created outside her bedroom window after spreading all these seeds over the years. This imagery has always been powerful to me, but it was made even more so after I read The Well-Gardened Mind by Sue Stuart Smith this past winter and learned how patients staying in hospital rooms with a nature-facing window recover 37% faster than patients who do not have this visual access to nature at all. This is leading to more hospitals instituting green spaces throughout their campuses as a real, science-backed method of care.
Reading this fact, it got me thinking that even outside of the carefully date driven measurements within a hospital, surely there must be some benefit to our wellbeing in simply going about our days surrounded by natural beauty. It’s not a far stretch when you picture how much more peaceful you feel outside. The sturdy presence of ancient trees combined with swaying branches, birdsong and the thrill of a flower in bloom stimulates our minds and encourages us to be mindful.
I imagine spreading seeds just like The Lupine Lady herself did, bringing beauty to the landscapes I call home and even leaving a legacy in the form of wildflowers throughout the land. It is the kind of quiet hope we all need these days - a flower popping up where there wasn’t one before. An offering to pause and enjoy our surroundings.
With the arrival of Earth Day 2023 this month, I am feeling the pull even stronger than usual to do something to connect with the Earth, celebrate the natural beauty around us and bring awareness to what needs to change in order to protect our home planet. The first Earth Day took place in 1970, marking the beginning of the modern day environmental movement as we now know it. It offers us the opportunity to promote conservation and sustainability, raising awareness of the impacts our decisions have on the environment. On this day, around 1 billion individuals across more than 190 countries take action to raise awareness of the climate crisis and bring about behavioral change to protect the environment through reducing our energy use, carbon footprint and more. It really is a great opportunity to reflect and find new ways to support our one and only home.
So where do seed bombs fit into all of this? Seed bombs are a fun and accessible way to bring a joyful nature activity into your Earth Day celebrations. Seed bombs are simply a collection of biodegradable materials like paper and clay shredded and combined with a variety of wildflower seeds, molded into a ball shape (or any shape you like really) and dried. Once dry, you can drop them on blank areas of earth by roadsides or parks and the ball will naturally break down in the elements, leaving only the seeds behind which will plant themselves and hopefully grow into beautiful flowers to support our pollinators.
As you’ll see, there are as many ways to make seed bombs as there are hands to make them with. But here are some of the main ingredients you can use in a seed bomb DIY:
Newspaper/paper scraps: any paper destined for the recycling bin will do, although you may want to ensure any dyes used were soy-based if you’re concerned about leaching dyes into the soil. Personally I think newspaper is just fine even if you can’t confirm the inks are soy based, but I wouldn’t necessarily use a brightly colored construction paper for this one since the dyes probably aren’t good for the soil.
Clay: if you’re having trouble with your seed bombs sticking together, clay is an excellent binder that can help give them some structural integrity. You don’t need this for a successful seed bomb though.
Topsoil and compost: Compost and topsoil aren’t strictly necessary for a wildflower seed bomb, but they will provide your seeds a little extra boost and may increase germination rates (or how many of your seeds will actually grow into flowers) since you’re effectively coating the seeds which mimics being buried in the ground. The thing about wildflower seeds is that they spread through landing on the surface of soil all the time, so they don’t really need to be buried to grow usually.
Seeds: You won’t need a huge bucket of seeds here since the majority of the mass of the seed ball is made up of the paper, but it is important to choose wildflower seed varieties or herbs and vegetables that are native to your area and will not encourage invasive species to grow.
The importance of choosing native seeds
Why does it matter what seeds you use in your wildflower seed bombs? Because the last thing you want to be doing on Earth Day is actually planting invasive plants that will crowd out native species. An invasive species is an introduced species that becomes overpopulated and harms its new environment. Invasive species adversely affect habitats and bioregions, causing ecological, environmental, and/or economic damage. Not a good thing! On the other hand, native plants will encourage and support your local pollinators by providing a diverse food source and tend to require less care, watering and other maintenance since they are hard-wired to grow well in your climate.
The easiest way to ensure you’re planting native seeds is to buy a seed mix from a reputable company such as American Meadows. They offer native wildflower blends for different regions across the USA. If you are outside of the USA, try to find a local garden supply company that can help you. Otherwise I’d recommend just choosing three or four flowers you’d like to grow and using trusty Google to confirm they are native to your area. I could give you a list that would cover the major areas, but you’ll learn better from doing a bit of the research yourself!
One last thing; I’m sure you know this, but it has to be said! Never distribute your seed bombs on private property or protected parks. Stick to civic spaces that have long since been neglected or local public areas that could use a bit of rewilding.
What plants are best for seed bombs?
We’ve talked a lot about wildflowers, but did you know that you can also use edible plants such as lettuce, sage, basil, cilantro and even tomato seeds in your seed bomb DIY? I personally used meadow flowers in my mix including black eyed susan, cornflower, marigold, Californian poppies, cosmos and bachelor button. I think using edible flowers and herbs would be so fun - imagine taking your morning walk through the neighborhood and seeing little patches of lettuce and calendula free for the taking for your afternoon snack! I dream of a day when our wild spaces are full of edible free food to share with our communities.

How to make seed bombs step by step
Supplies
Newspaper/paper scraps
Wildflower seeds (native to your area)
Bowl
Water
Parchment paper
Baking sheet/plate
OPTIONAL: clay, compost, topsoil
Instructions:
Making seed bombs is simple. Shred your paper into small pieces and soak in water, or soak whole pieces and then blend in a food processor. Combine your shredded paper with seeds (and compost/clay/topsoil if you’d like) in a bowl. Form into golf ball sized globes and squeeze tightly to compress and remove excess moisture. Place on your parchment paper on the baking sheet or just use a plate and allow to dry for 24 hours before using. You can even place them into a small drawstring bag and give them out as Earth Day gifts to friends and family!
How do you use seed bombs?
Seed bombs are one of my favorite nature craft ideas, because they are simple, fast and easy for anyone to do and the result is a more beautiful planet. Since the seeds do not need to be buried to grow, you can just toss your seed bombs into empty and neglected areas, watch and wait and in a few months you should have some beautiful flowers growing! The patch will likely self-seed and continue to develop and grow with each passing year that goes by.
If you’re looking for nature walk activities to do this Earth Day, I hope you’ll give this seed bomb DIY a try and bring them along with you on your adventure. And remember: every day should be Earth Day, so if you’re reading this and it’s already come and gone, don’t let that stop you from giving it a try and bringing some beauty to our one and only home!


![The Power of Nature: How To Make Infused Oregano Oil for Your Health and Wellness [Recipe]](https://images.squarespace-cdn.com/content/v1/60e85024dc86d643da81c96a/1682625337753-AFI1M6MRRMDQ5CBNY2TX/unsplash-image-Fl2Ki3_GZIU.jpg)
![Make This Easy + Natural Botanical Hand Salve [Recipe]](https://images.squarespace-cdn.com/content/v1/60e85024dc86d643da81c96a/b57698b0-de70-4101-afaf-7af57788237d/Herbal+Face+Steam+Recipe+by+The+Cottage+Peach-1.jpg)
![Make This Safe Oil Lamp With a Mason Jar and Olive Oil [Tutorial]](https://images.squarespace-cdn.com/content/v1/60e85024dc86d643da81c96a/4b41f060-48ac-4a43-9513-da483e392f3b/December+2022+The+Cottage+Peach-8.jpg)
Make This Safe Oil Lamp With a Mason Jar and Olive Oil [Tutorial]
February’s of my childhood often are filled with dim memories of snow storms and subsequent power outages, leading to inevitable candlelight dinners cooked over the fireplace. The warmth and flicker of the various fires we had lit both small and large reign in my recollection of those times. I can still smell the matches burning off after being extinguished, the light smoke wafting through the air to settle on clothing and blankets. Despite the bitter weather outside and the temporary lack of electricity, we were never cold. We had hats, sweaters, blankets, and each other.
Nowadays like many others in this community I find solace in the light of a candle. The eternal dance of flame is grounding and comforting, a reassuring hand when things feel like they may never warm back up again. I’ve experimented with candle making of all kinds - dipped beeswax tapers, pillars and hand poured jars of soy wax to name a few. So it was about time to try my hand at perhaps the easiest DIY flame source you can create - the DIY mason jar oil lamp.
The Cottage Peach is reader-supported. When you purchase through links on our site, we may earn an affiliate commission at no additional cost to you. All opinions are our own.
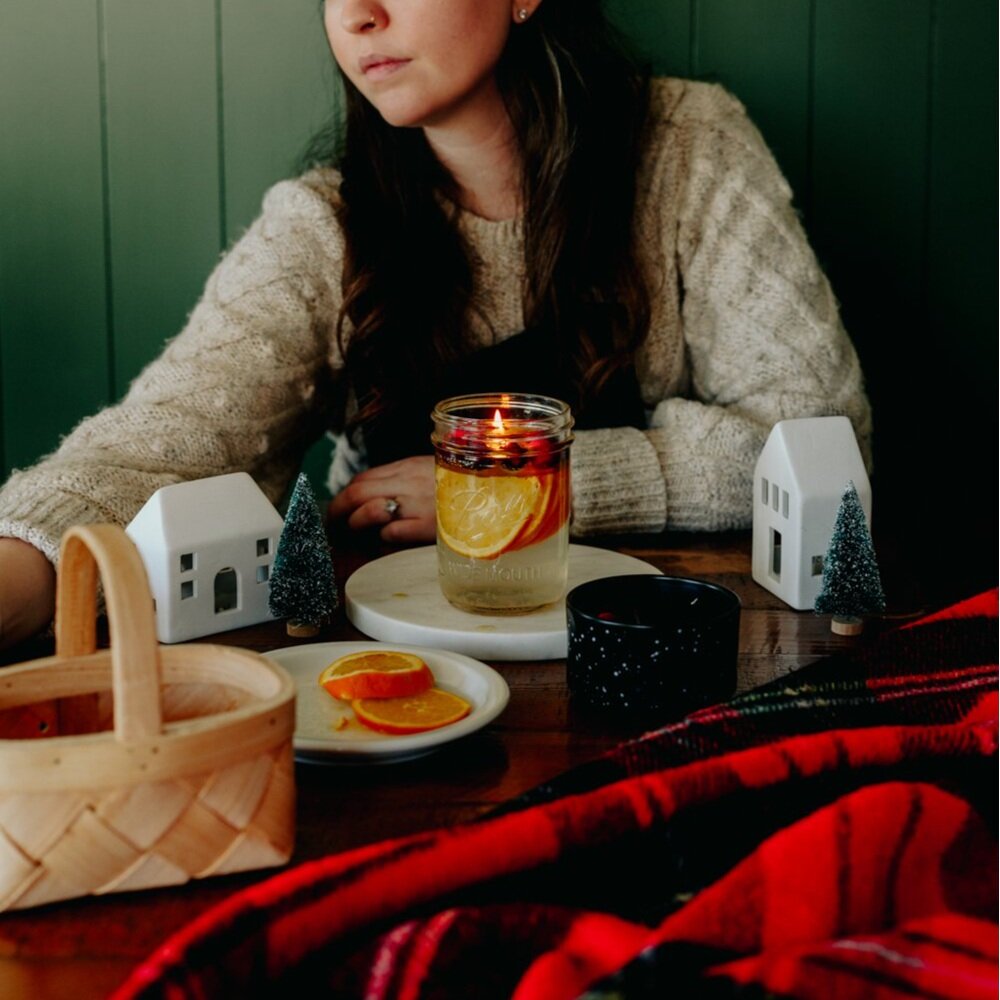
While the days may be slowly but surely lengthening, we are still very much in the winter season here in New England. February’s of my childhood often are filled with dim memories of snow storms and subsequent power outages, leading to inevitable candlelight dinners cooked over the fireplace. The warmth and flicker of the various fires we had lit both small and large reign in my recollection of those times. I can still smell the matches burning off after being extinguished, the light smoke wafting through the air to settle on clothing and blankets. Despite the bitter weather outside and the temporary lack of electricity, we were never cold. We had hats, sweaters, blankets, and each other.
Nowadays like many others in this community I find solace in the light of a candle. The eternal dance of flame is grounding and comforting, a reassuring hand when things feel like they may never warm back up again. I’ve experimented with candle making of all kinds - dipped beeswax tapers, pillars and hand poured jars of soy wax to name a few. So it was about time to try my hand at perhaps the easiest DIY flame source you can create - the DIY mason jar oil lamp.
Olive oil lamps are ubiquitous at archaeological sites across the Mediterranean region. Unsurprisingly, the most common oil used in the Mediterranean region was olive oil. In 2022, a 2300 year old olive oil lamp was unearthed in the West Bank. Clay lamps that used oil as a fuel source appeared during the Bronze Age around the 16th century BC and were ubiquitous throughout the Roman Empire. Thanks to all this evidence, there’s reason to believe that oil lamps appeared at the very dawn of human history. But we don’t need to go back in time to make our own DIY oil lamp. In fact, this simple mason jar craft can be made in minutes using items you may already have at home.
How oil lamps work:
Floating wicks come in a pack with the floating portion separated from the wick. You’ll place the wick in the hole in the center of the floating disk piece with half the wick on each side of the disk. This way, when you place the wick in the oil lamp, the oil will be drawn up through the wick and be vaporized and burned by the flame.
Are oil lamps expensive?
Not at all. Since one tablespoon of oil can burn for two hours in your lamp, it is much cheaper than most candles. This is a great addition to your emergency supplies, as well as being a beautiful addition to your table. For storm prep, all you need to make sure you have is a pack of the floating wicks, some olive oil, a mason jar and water and you can keep your home safely lit without electricity during a power outage.
Are oil lamps safe?
The danger of oil lamps comes from the possibility of spilling. If the lamp were tipped over while burning, the spilled oil would all catch fire all at once on whatever surface it spilled onto. Thankfully, olive oil has a very high flash point which means it’s not super flammable. Plus, we’ll only be using a small amount of oil - the rest of the liquid in our mason jar will be water. If our DIY oil lamp tipped over, it should extinguish itself immediately. That said - it’s always important to practice fire safety around any type of open flame. Always burn within sight, keep away from pets and children and away from any flammable materials. Never move your oil lamp while still burning. I assume no responsibility for any damage that may occur due to misuse of your diy olive oil lamp.
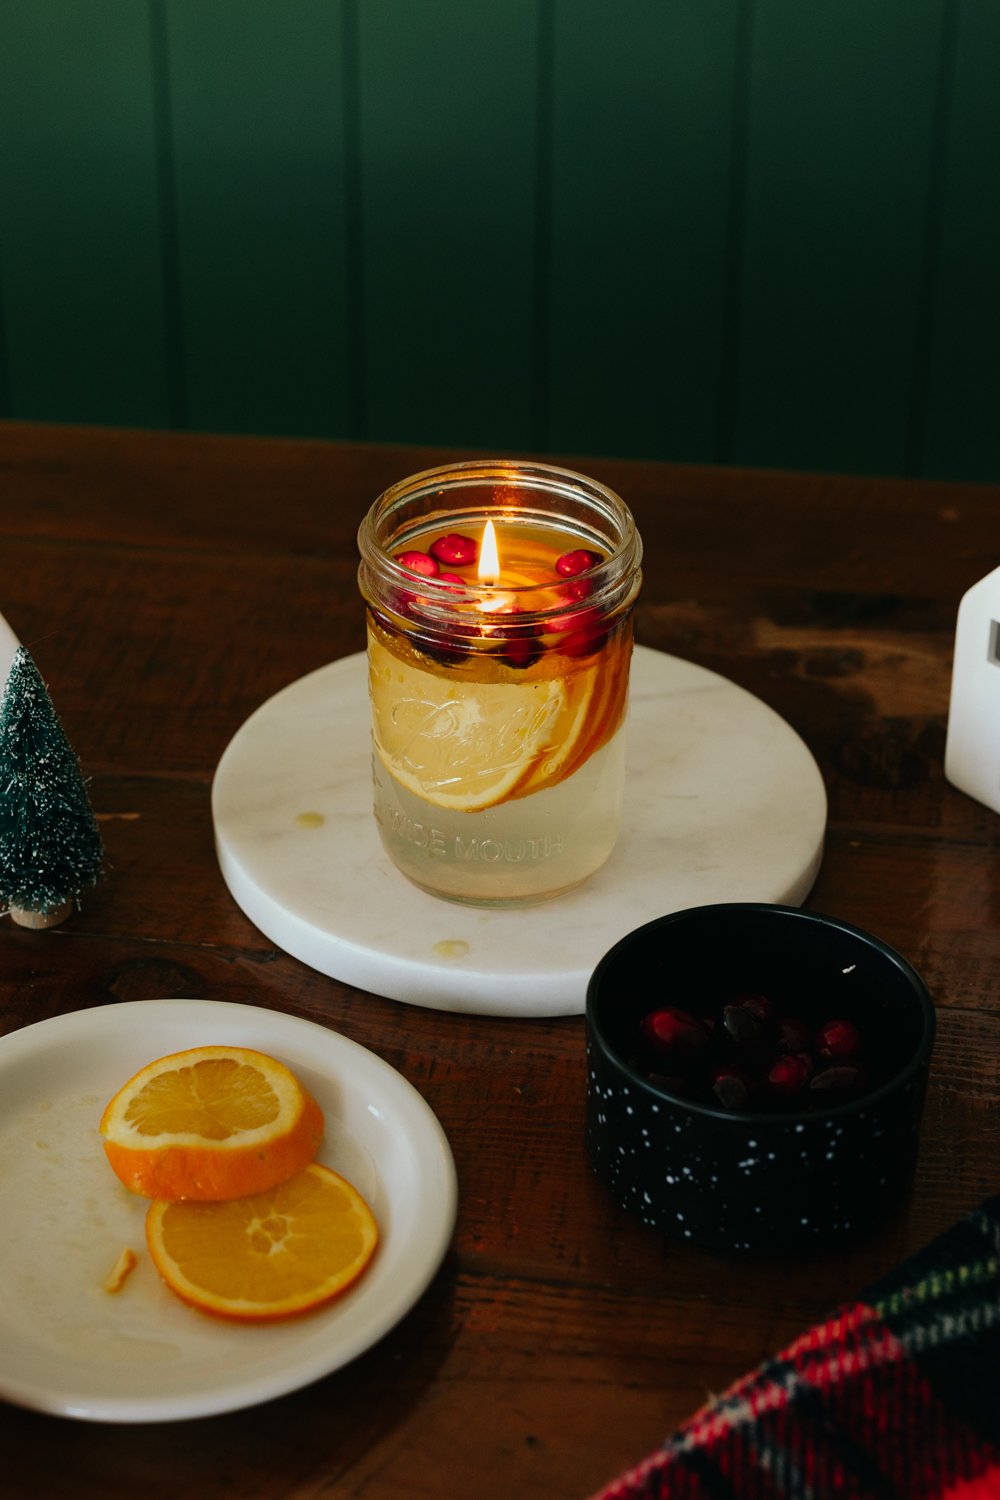
How to make a DIY Mason Jar Olive Oil Lamp:
The options are endless when you make your own olive oil lamp, and you’ll find inspiration below for different ways to turn your lamp into beautiful mason jar decor. But let's cover the basics first!
Supplies:
Mason jar (any size, I used a pint jar)
Floating wicks
Olive oil
Water
Decorative items to submerge in the water
Instructions:
Fill your mason jar until there is about half an inch of empty space at the top
Add any decorative items that you can submerge in the water - just be sure not to choose anything that will float too close to the surface and disrupt the flow of oil to the wick.
Pour olive oil into the mason jar on top of the water until the oil layer is about a quarter inch thick
Gently place the floating wick on top of the oil surface, light and enjoy your olive oil lamp.
Ideas for how to decorate your mason jar olive oil lamp:
Christmas mason jar olive oil lamp
Red holly berries, pinecones, cranberries, vintage ornaments and evergreen clippings are great for the holiday season. Choose materials in natural shades of green, red and brown and play with mixing different textures.
Fall mason jar olive oil lamp
Fall foliage in bright oranges, reds and yellows can be suspended in the water. Better yet, replace the mason jar with a hollowed out mini pumpkin!
Winter mason jar olive oil lamp
Birch bark from fallen branches, acorn caps, evergreen clippings and even twigs will capture the chill months of winter in a cozy fashion.
Spring mason jar olive oil lamp
Fresh crocus blooms, dandelions, tulips, eggs and apple blossom branch clippings will all celebrate the season of growth and fertility.
Summer mason jar olive oil lamp
Embrace the season of abundance with fresh herbs from the garden like mint and basil, cherry tomatoes, sunflowers, lavender, fresh fruit and berries.
Beachy mason jar olive oil lamp
Bring the beach bonfire to you with sand, seashells and seaglass (responsibly sourced if you can’t obtain them yourself of course)
Citrus mason jar olive oil lamp
Exactly what it sounds like - but no need to dump a few lemons in chaotically. Shake things up with different shapes, sizes and a variety of citrus fruits including lemons, oranges or clementines (sliced or whole) and a bit of green with sliced cucumber rounds or fresh leaves.
Floral mason jar olive oil lamp
Celebrate whatever is growing most abundantly in your flower beds at the moment and suspend your favorite cut flower in your lamp - try hydrangea, poppies, bleeding heart, sweet pea, roses, peonies or lilies. You can leave them whole, or just use the petals.
Crystal mason jar olive oil lamp
Place your favorite crystals in your oil lamp - just be sure not to use crystals that can dissolve in water - As a general rule of thumb (with some exceptions), crystals ending with “ite” tend to dissolve in water. Try crystals like Clear Quartz, Rose Quartz, Amethyst, Smokey Quartz, Citrine, Agate, Carnelian, Rutilated Quartz, Jasper, Tiger's Eye, Aventurine or Moonstone.
Mason jar decor is one of my favorite ways to update our home decor, because we always have the jars on hand and they are such a great blank slate from which you can creatively experiment with little effort.