BACKYARD GARDENING MADE SIMPLE

5 Tried-and-Tested Techniques for Preserving Your Garden Harvest
Preserving excess produce not only helps reduce food waste, but it also allows you to save money by avoiding buying produce out of season. With a little planning, you’ll even be able to create heat and serve convenience foods for busy nights when cooking isn’t an option, giving you healthy options to choose from. Additionally, preserving produce allows you to enjoy the fruits of your labor long after the growing season has ended. It's also a great way to ensure that you always have healthy, homegrown ingredients on hand for your favorite recipes.
One of the best things about gardening is the daily access to fresh, nutritious fruits, vegetables, and herbs. However, in the height of summer it is easy to become overwhelmed by a harvest that is more than you can consume, so it's important to learn how to preserve excess produce for later use.

There are many different methods of preserving fruits, vegetables, and herbs, but today we’ll be covering canning, freezing, dehydrating, pickling, and fermenting. These preservation methods allow you to enjoy your homegrown produce all year round and reduce food waste. Food waste is a problem for several reasons. Firstly, it contributes to environmental issues such as greenhouse gas emissions, as uneaten food in landfills decomposes and produces methane gas. Secondly, it wastes valuable resources such as water, energy, and labor used in producing, transporting, and preparing the food. Thirdly, it contributes to food insecurity, as there are many people who do not have access to enough food. Finally, it is a waste of money for individuals and businesses, as they are essentially throwing away the money they spent on the food. By reducing food waste, we can help address these issues and create a more sustainable food system.
Preserving excess produce not only helps reduce food waste, but it also allows you to save money by avoiding buying produce out of season. With a little planning, you’ll even be able to create heat and serve convenience foods for busy nights when cooking isn’t an option, giving you healthy options to choose from. Additionally, preserving produce allows you to enjoy the fruits of your labor long after the growing season has ended. It's also a great way to ensure that you always have healthy, homegrown ingredients on hand for your favorite recipes.
This post will give you a broad overview of the different ways to preserve foods, but if you’re interested in diving deeper into the specifics, let me know in the comments which method you’d like to learn more about.
Canning Homegrown Food
Canning is a popular method of preserving fruits, vegetables, and even meats. Canning is a great way to preserve high-acid fruits such as berries, peaches, and apples, as well as tomatoes and some types of pickles. Low-acid foods such as green beans, corn, and meat require pressure canning to prevent the growth of harmful bacteria.
The basic process involves heating the food in a jar to kill bacteria and create a vacuum seal. This prevents spoilage and allows the food to be stored for long periods of time. To get started with canning, you will need a few pieces of equipment, including a water bath canner or pressure canner, canning jars, and lids.
To prepare fruits and vegetables for canning, it's important to start with fresh, ripe produce. Wash and trim the produce, removing any stems, leaves, or bruises. Follow a trusted recipe for the type of food you are canning, as different foods require different processing times and methods. The best resource for this is The National Center for Home Food Preservation. Once the food is packed into the jars, process them in a water bath canner or pressure canner according to the recipe instructions.
To store canned foods, keep them in a cool, dry place away from direct sunlight. Check the seals on the jars regularly to ensure they are still airtight. Canned foods can last for up to one year, but it's important to use them within a reasonable timeframe to ensure optimal flavor and quality.
Click here for my full guide to learn how to water bath can food.
Freezing Your Garden Produce

Freezing is a convenient and easy method of preserving fruits, vegetables, and herbs. Freezing is an excellent method for preserving vegetables that you plan to cook later, as well as fruits such as berries, peaches, and mangoes. Most vegetables and fruits can be frozen, but some may require blanching (briefly boiling and then cooling in ice water) before freezing to prevent enzyme action and maintain color and flavor.
The basic process involves blanching the produce to stop enzyme activity, then freezing it in airtight containers or bags. Freezing can preserve the flavor and nutrients of the produce for up to six months or longer, if you vacuum seal your bags.
To get started with freezing, you will need a few pieces of equipment, including a large pot for blanching, a colander, airtight containers or bags, and a freezer. A vacuum sealer is optional.
To prepare fruits and vegetables for freezing, start with fresh, ripe produce. Wash and trim the produce, removing any stems, leaves, or bruises. Blanch the produce by dipping it in boiling water for a brief period, then transferring it to ice water to stop the cooking process. Drain the produce in a colander, then pack it into airtight containers or bags, removing as much air as possible.
To store frozen foods, keep them in a freezer at 0°F or below. To thaw frozen foods, move them to the refrigerator to thaw slowly. Avoid thawing at room temperature or in the microwave, as this can lead to uneven thawing and loss of texture.
Click here for my full guide to learn how to ferment food.
Dehydrating Herbs and More
Dehydrating is a method of removing moisture from fruits, vegetables, and herbs to create shelf-stable, dried foods. Dehydrating is a great way to preserve fruits such as apples, bananas, and mangoes, as well as vegetables such as tomatoes, peppers, and zucchini. Herbs and spices can also be easily dried and stored.
The basic process involves slicing the produce, arranging it on a dehydrator tray, and allowing it to dry at a low temperature for several hours. You can also dehydrate at a low temperature in your oven, but this will take longer and use more energy.
To get started with dehydrating, you will need a dehydrator and a knife or mandoline for slicing the produce.

To prepare fruits, vegetables, and herbs for dehydrating, start with fresh, ripe produce. Wash and trim the produce, removing any stems, leaves, or bruises. Slice the produce into even pieces, then arrange it on a dehydrator tray. Follow the instructions for your specific dehydrator model, as drying times and temperatures may vary.
To store dehydrated foods, keep them in airtight containers or bags in a cool, dry place away from direct sunlight. Dehydrated foods can last for up to a year or longer, but it's important to use them within a reasonable timeframe to ensure optimal flavor and quality.
Click here for my full guide to learn how to dehydrate food.
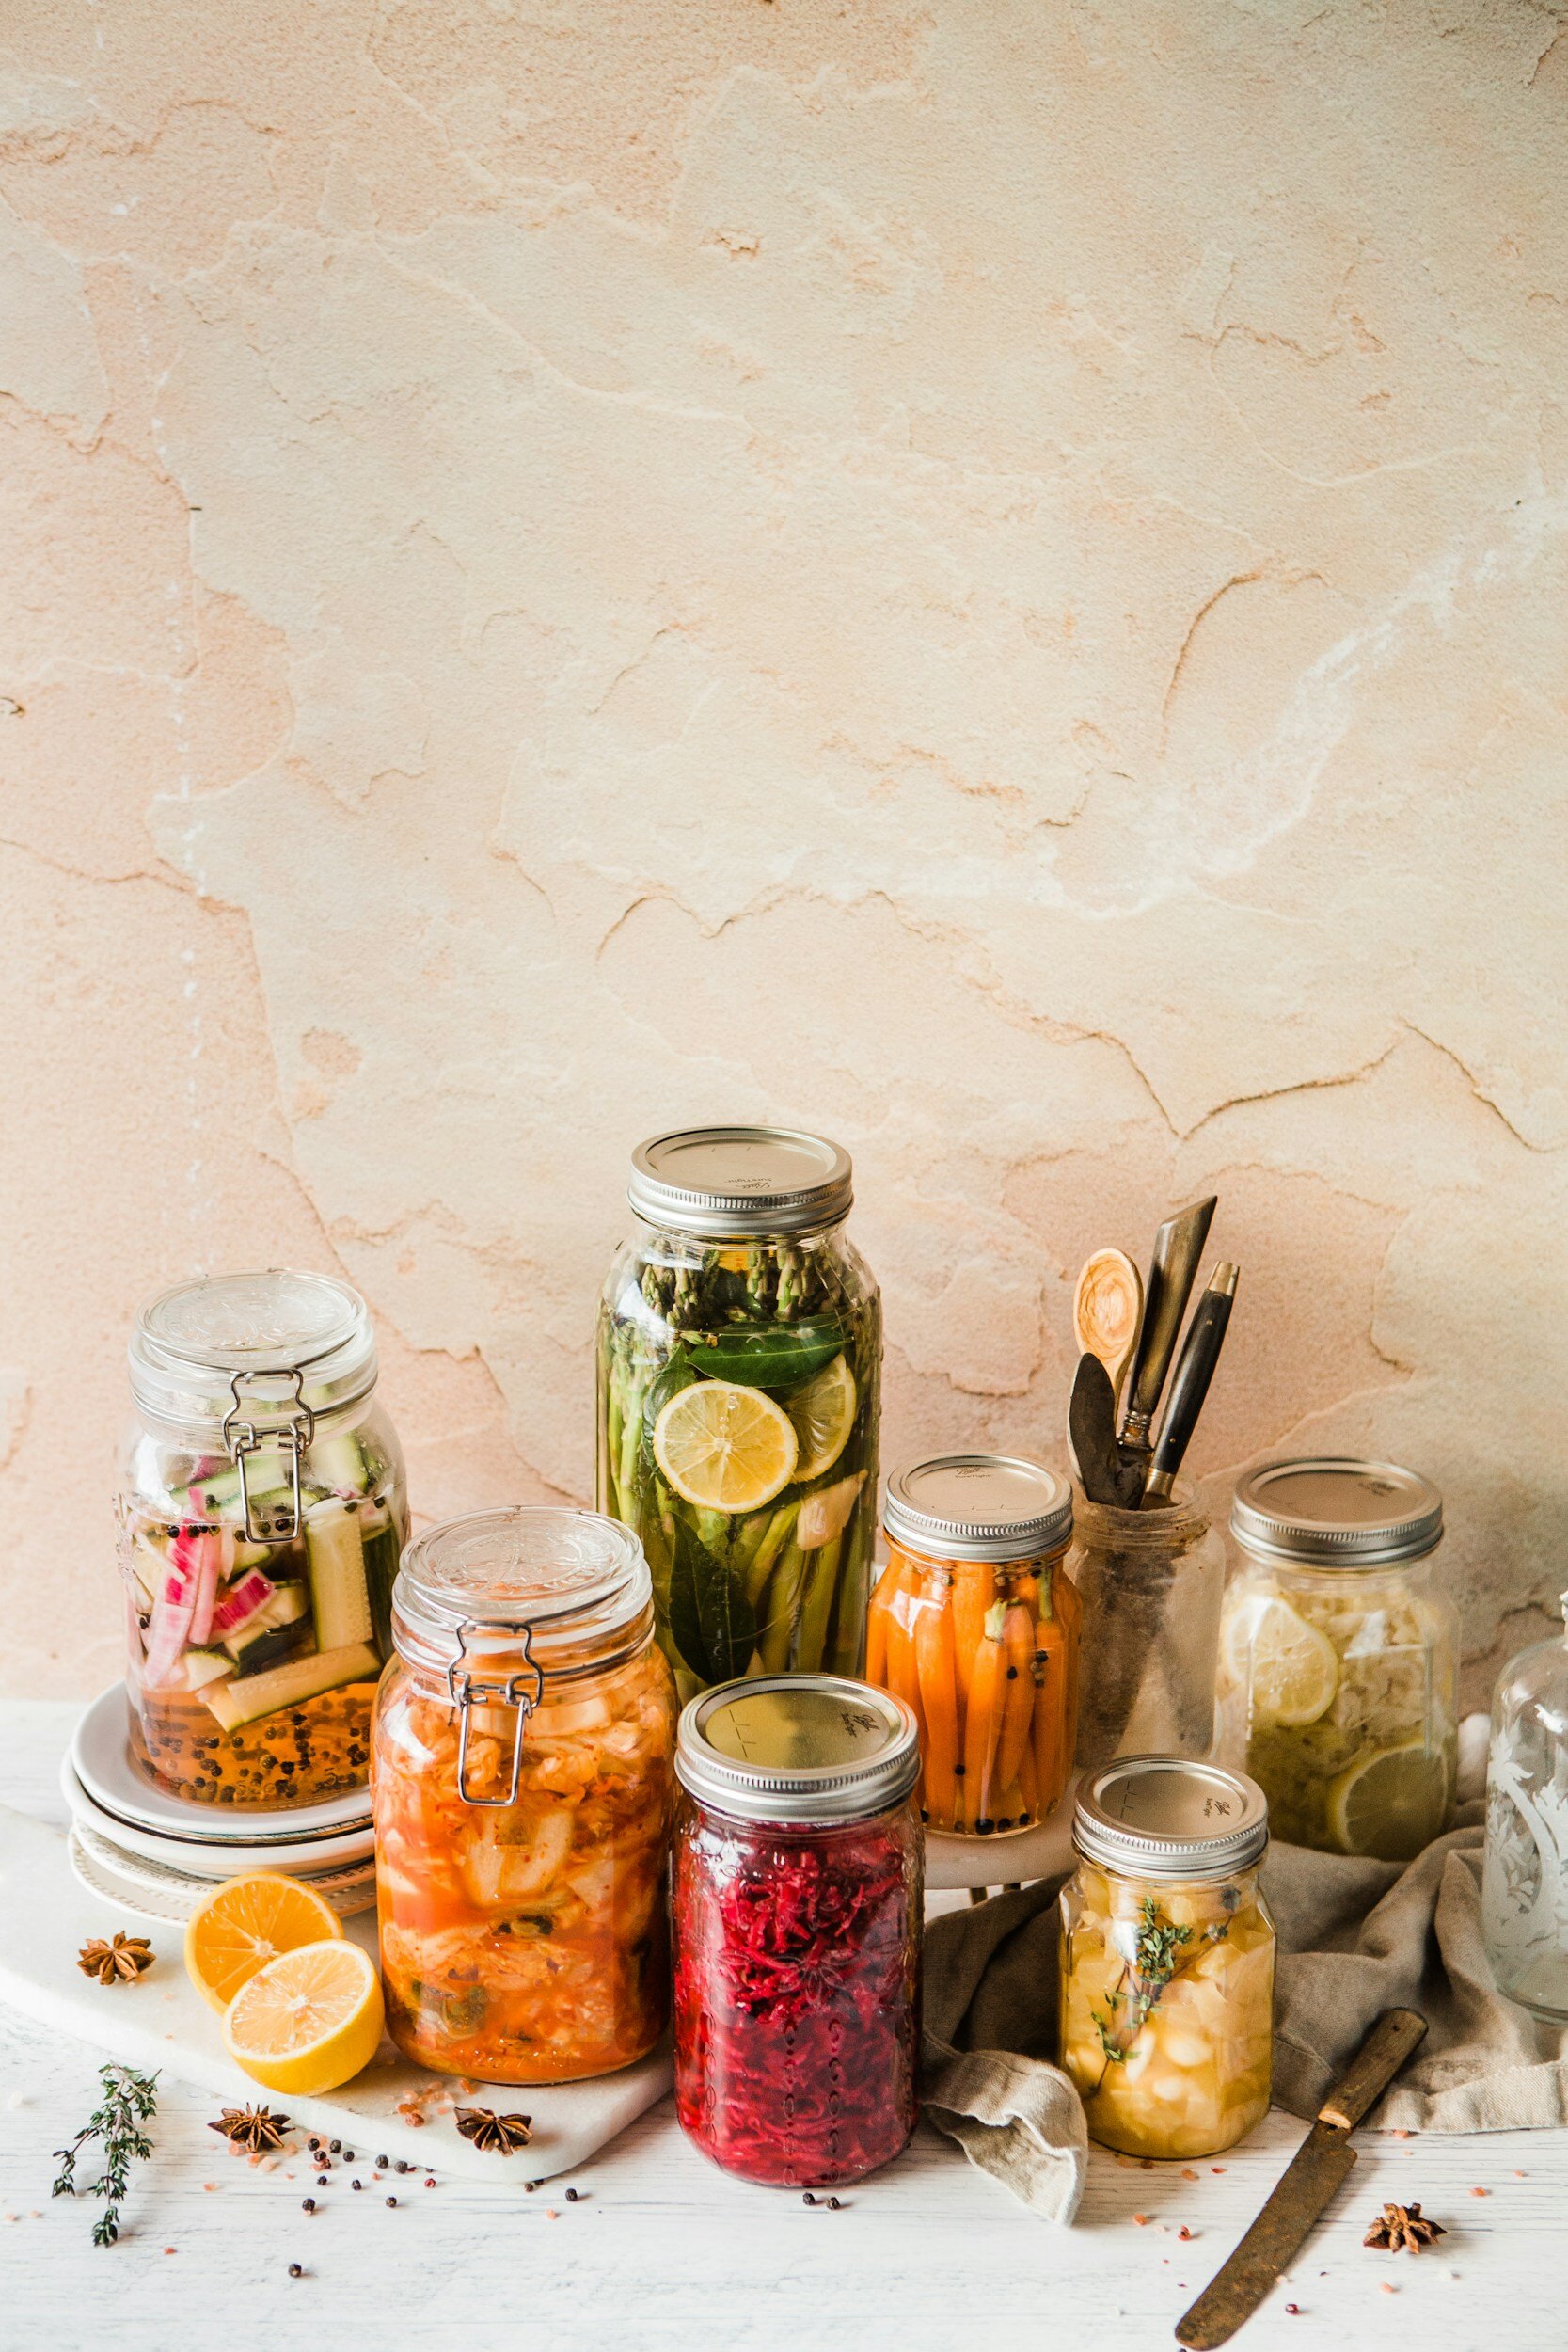
Pickling Garden Picks
Pickling is a method of preserving fruits and vegetables in a brine made from vinegar, salt, and spices. The acidity of the vinegar helps to prevent spoilage and enhance flavor. Pickling is a great way to preserve cucumbers, beets, carrots, green beans, and other vegetables. Fruits such as peaches and pears can also be pickled.
To get started with pickling, you will need a few pieces of equipment, including a large pot for boiling the brine, canning jars, and lids.
To prepare fruits and vegetables for pickling, start with fresh produce. Wash and trim the produce, removing any stems, leaves, or bruises. Follow a trusted recipe for the type of food you are pickling, as different foods require different brine ratios and processing times. Once the food is packed into the jars, pour the hot brine over the top, leaving a small amount of headspace.
To store pickled foods, keep them in a cool, dry place away from direct sunlight. Pickled foods can last for several months, but it's important to use them within a reasonable timeframe to ensure optimal flavor and quality.

Fermenting for Health
Fermenting is a method of preserving fruits, vegetables, and even dairy products by allowing beneficial bacteria to grow and multiply. The bacteria convert sugars and starches into lactic acid, which gives fermented foods their tangy flavor and helps to prevent spoilage. Fermenting is a great way to preserve vegetables such as cabbage, carrots, and cucumbers, as well as fruits such as lemons and limes. Fermented foods such as sauerkraut, kimchi, and pickles are also great sources of beneficial probiotics.
To get started with fermenting, you will need a few pieces of equipment, including a fermentation crock or jar, weights, and an airlock.
To prepare fruits, vegetables, and herbs for fermenting, start with fresh produce. Wash and trim the produce, removing any stems, leaves, or bruises. Follow a trusted recipe for the type of food you are fermenting, as different foods require different salt ratios and processing times. Pack the food into a fermentation crock or jar, adding salt and any desired spices or seasonings. Place weights on top to keep the food submerged in the brine, then attach an airlock to allow gas to escape during fermentation.
To store fermented foods, keep them in a cool, dark place, such as a basement or refrigerator. Fermented foods can last for several months or longer, but it's important to use them within a reasonable timeframe to ensure optimal flavor and quality.
Growing and preserving your own food can feel overwhelming as you are getting started, and it can be difficult to know which preservation method is best for you. Each method has its own set of benefits and considerations, and the best method for you will depend on the type of food you are preserving, your energy levels and your personal preferences. Because of my chronic pain, I tend to avoid intensive projects like canning. My favorite method of preserving food is to freeze in vacuum sealed bags or jars in our chest freezer.
If time is short and your harvest basket is overflowing I’m willing to bet you’ll have no trouble convincing a neighbor to share in your bounty too! Some of the best friends are made over food.

![Taste the Freshness: Garden to Table Garlic Scape Pesto [Recipe]](https://images.squarespace-cdn.com/content/v1/60e85024dc86d643da81c96a/1685124491791-T2P2WL9T6HWQJGW63DLT/PXL_20220617_153907513.PORTRAIT%281%29.jpg)
Taste the Freshness: Garden to Table Garlic Scape Pesto [Recipe]
One of the first ways I know that June has arrived is in the appearance of garlic scapes. Tiny white cloves planted way back in October have been waiting for this day to send their shoots high into the sky, the flowering stalks both otherworldly and beautiful as they twist and turn, narrow green tendrils dancing in the breeze that has yet to turn into the humid and stagnant air of full summer.
Garlic scapes aren’t something you can find in the grocery store, and while you may be able to find a single stall at your local farmers market that has them, their inventory will be short-lived. The season for scapes is small, a window of just a couple of weeks that adds to their novelty. Just another excellent excuse to grow them yourself as a side-effect of your garlic harvest.
June is the beginning of abundance in the garden, when our little acre reminds us she can support us with a never ending harvest of many kinds. I find myself taking breakfast, lunch and dinner outside as often as possible, breathing in the fresh air and listening to the birdsong while I ask myself how I got so lucky. Our little patch of earth has so much history hidden in its roots, but when summer begins again it is clear she knows precisely what she is doing when it comes to helping living things thrive.

Our neighbors grew up in our house, so we’ve been lucky enough to learn bits and pieces of what the land has accomplished in the past. This is how I know that the stone foundation of my home originally held up a beautiful chicken barn, and that rabbits were raised on the back lot. As we add our own stories to this history, I wonder too at the echoes of a less happy time before our even our neighbors came here, a time when lands were taken from the Wampanoag. How many feet have tread this earth before us and called it theirs? How much pain was inflicted on this very spot? Only the land remembers now.
One of the first ways I know that June has arrived is in the appearance of garlic scapes. Tiny white cloves planted way back in October have been waiting for this day to send their shoots high into the sky, the flowering stalks both otherworldly and beautiful as they twist and turn, narrow green tendrils dancing in the breeze that has yet to turn into the humid and stagnant air of full summer.
Garlic scapes aren’t something you can find in the grocery store, and while you may be able to find a single stall at your local farmers market that has them, their inventory will be short-lived. The season for scapes is small, a window of just a couple of weeks that adds to their novelty. Just another excellent excuse to grow them yourself as a side-effect of your garlic harvest.
There are two types of garlic you can plant; hard-neck or soft-neck. Soft-neck garlic does not produce scapes, so if you’re interested in trying this delicacy you’ll need to plant hard-neck varieties only. Hardneck varieties of garlic are divided into eight groups: Porcelain, Rocambole, Purple Stripe, Glazed Purple Stripe, Marble Purple Stripe, Asiatic, Turban, and Creole. Porcelain is considered the hardiest type of hardneck garlic and is highly recommended for novice gardeners in cold climates, producing big, beautiful bulbs with satiny white wrappers with a strong flavor. As I mentioned, you’ll need to do some planning ahead if you want to grow garlic. It needs to be overwintered, so you’ll plant it just before your first frost in the fall and then wait until the following summer to harvest the bulbs.
In the meantime, scapes offer a taste of what is to come - a preview of your garlic harvest that can help you to tolerate the long wait required when growing garlic. To me, it is a promise the land provides. Good things we grow are always worth the wait. And garlic scapes are one of the very best things of all.
I do like to devise as many ways as possible to extend our enjoyment of garlic scapes, and thankfully they are a versatile plant that makes it easy to preserve. I’ve tried just about every method imaginable, but by far my favorite way to use scapes is to make my garlic scape pesto recipe. This liquid gold is quickly scooped up by everyone who tries it, useful as more than just a pasta topping. It also stores incredibly well in this form, locking in the deliciously grassy and mild garlic flavor so that we can enjoy it as long as possible.
What are garlic scapes?
Garlic scapes are the flowering head of the hard-neck garlic plant.They are edible, and you want to cut them off the plant before they have a chance to flower so that your garlic bulbs can put their energy into the root instead, allowing the bulb to grow larger.
What month do you cut garlic scapes?
Garlic scapes are harvested in June, about a month before you harvest the garlic bulb. Garlic scapes twist into a corkscrew shape as they grow and ripen. You will know they are ready to pick when the scape has made almost one full twist. The flowering head should still be compact and small. You can pick them when they are smaller as well, you’ll just get a smaller yield. If you pick them later than this, they will be very tough to chew.
How do you cut garlic scapes for pesto?
The easiest way to cut garlic scapes is to snap them off at their natural breaking point with your fingers. You do not need clippers to harvest garlic scapes. Grab the scape close to the base where it meets the leafy part of the garlic bulb (leave the leafy bits intact) They will break off easily in your hand.
What part of garlic scapes do you eat?
You can eat the entire garlic scape. Some people prefer to remove the flowering head at the end, as it can get a little tough depending on how late you harvest them. For garlic scape pesto, it shouldn’t really matter since you are blending it up so I like to use the entire scape.
Do garlic scapes need to be cooked?
No, garlic scapes may be eaten raw or cooked.
What do garlic scapes taste like?
Garlic scapes are like the garlic cloves' more subtle, mild cousin. A light green crunch makes them a super fresh addition to salads and stir-fries.
What is the best thing to do with garlic scapes?
My favorite way to use garlic scapes is to make garlic scape pesto. It’s easy and freezes well. You can also chop it up and mix with cream cheese or butter for a flavorful spread, add to salads and stir fries and enjoy as a garden snack. I even put a little dollop with my cracker and cheese boards.
What does garlic scape pesto taste like?
Garlic scape pesto tastes like mild garlic with less spicy heat and a little bit of grassiness. You can control the acidity and flavor profile with the addition of high quality oils, cheese and nuts.
How long does garlic scape pesto last in the fridge?
With proper storage, garlic scape pesto can last up to 2 weeks in the fridge.
Can I freeze garlic scape pesto?
Yes, garlic scape pesto is an excellent way to preserve the fresh flavors of early summer for the whole year. You can freeze garlic scape pesto by filling an ice cube tray and placing in the freezer for individual portions, or freeze tablespoon size portions on a baking sheet, remove once fully frozen and place in a Stasher bag. I like to fill four ounce mason jars and freeze - just remember to leave room at the top of the jar as the pesto will expand slightly as it freezes.
Can you freeze garlic scapes raw?
Yes, garlic scapes may be frozen raw with no blanching required to enjoy all year long. They may also be dehydrated or dried and ground into a powder.
Are garlic scapes as healthy as garlic?
Yes, garlic scapes are healthy. Garlic scapes contain manganese, vitamin B6, vitamin C, and selenium.
What to use garlic scape pesto on
Garlic scape pesto is a super versatile ingredient to have in your fridge. Of course, it can be used on pasta, but one of my favorite ways to use it is as a spread on sandwiches or grilled cheese. You can also toss your vegetables in the pesto before roasting.
To make this garlic scape pesto recipe, you will need a food processor, blender or immersion blender to grind the scapes into a fine paste. I will break the scapes into smaller pieces before blending. They’re a pretty dry thing to put in a blender, so you’ll need to scrape down the sides a couple of times as you go. If you don’t have a blender you can finely chop the garlic scapes, but the effect will be slightly different and crunchier.
Supplies
Blender or immersion blender
Measuring cup
Tablespoon
Spatula
Jars for storage
Ingredients
2 cups garlic scapes (chopped)
1 cup sunflower seeds
1 cup basil
1 cup parmesan (grated)
1 cup olive oil
3 tbsp lemon juice
Salt and pepper to taste
Instructions
Grate the parmesan
Add all the ingredients to the food processor and blend until smooth
Taste and adjust the seasoning to your liking
Transfer to jars and store in the fridge for up to two weeks
Garlic Scape Pesto
Ingredients
- 2 cups garlic scapes (chopped)
- 1 cup sunflower seeds
- 1 cup basil
- 1 cup parmesan
- 1 cup olive oil
- 3 tbsp lemon juice
- Salt and pepper to taste
Instructions
- Grate the parmesan and roughly chop the garlic scapes
- Add all the ingredients to the food processor and blend until smooth
- Taste and adjust the seasoning to your liking
- Transfer to jars and store in the fridge for up to two weeks